photo Separate_zpsee6734da.jpg  photo about_zps8c821b8c.jpg  photo portfolio_zps8d0d9d7f.jpg  photo bloglovin_zpsa2e5e23c.jpg
 photo 30by30_zps098a90d4.jpg  photo instagram_zpse717f74f.jpg  photo facebook01_zps3b7e857c.jpg  photo Separate01_zps16ecb567.jpg
Showing posts with label photoshop. Show all posts

Thursday, May 31, 2012

Photo Editing Websites

Today I'd like to share a few of the editing websites I like to use in post-processing photographs. I have a super older version of photoshop that is currently not working on my computer, and a new version of photoshop that had a 30 day trial which ended a few days ago. I know, sad for me, right? But, there are free ways around things when you don't have the software! These are three websites I like to go for specific edits.

1. AutoStitch
This is an editing website I use to create panoramas, bokeh backgrounds, or shallow depth of field for my photographs (you can see more examples of photo stitches here). It doesn't give as much freedom as the photo stitch option in photoshop does, but if you take pictures carefully (id same exposure for each image) and try not to leave gaps, this website will do the trick.

2. Pixler
I love this website and I use it all the time. It's like my photoshop away from photoshop! It's great for simple edits such as editing lighting, image size, cropping, artsy fartsy effects, almost everything photoshop can do but with slightly less user control. I also use this website for work all the time for sizing photos. You can also do some graphic design things to create buttons and ads.


Remember when tiltshift was all the rage? I have an example of photos I took when I first found out about tiltshifting which you can see here. I also did a tilt-shift of some compost. Yay compost!

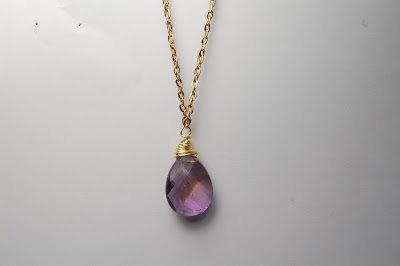
 photo tiltshift1.jpg


Finding out about these websites was super helpful for me, so I hope they help you in your post-processing endeavors.

Monday, October 17, 2011

Halloween Portraits

These are some of the edited photos from the Halloween themed shoot I did with the deadly doodler. The lighting and studio were pretty ridiculous, as you can see from this entry here. We worked with what we could, and these are the photos that came out the best:

"Halloween Portrait"
Halloween 1

"Goth Doll"
Goth Doll

"Crawler"
Crawler

"Goth Doll with Candle"
Goth Doll with Candle

"Halloween Portrait 2"
Halloween Portrait 2


I still have a lot to learn in dealing with post-processing. This was great practice and I'm excited to do more.

News:
  • I have an interview today for a full time job. I am thoroughly ecstatic.
  • I really appreciate all the comments over the weekend about my Etsy shop. I will be changing a lot of things through November and will hopefully have plenty of new things for Let It Be Raw in December and the new year.
  • I have officially started a new project in black and white, and I am looking forward to sharing parts of it soon.

Tuesday, October 4, 2011

Grapes

Grape Harvest

One of the great things about living in California is that you probably know someone or have a friend of a friend that is involved with wine making. Lucky for me Nick's parents have some vines growing around the fence in their backyard. We picked all the grapes last weekend and squished them all into buckets. I'll be checking in on the wine making process next time I visit them (and hope to soon have some taste tests)!

Friday, September 23, 2011

Guest Post --- Deer in a Bottle

Hi everyone! I'm happy to share with you an easy tutorial for making your product photographs beautiful! I use this for all my jewelry in my etsy shop.

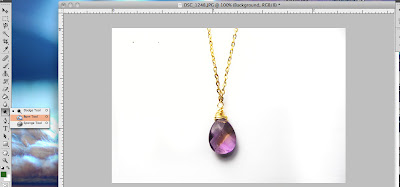
First take a photo that obviously needs some retouching. I used my nikon with a lightbox set up for this photo, but it still could use a little work.


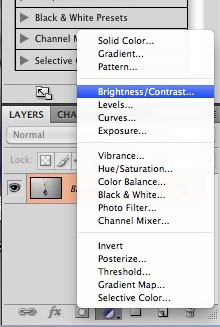
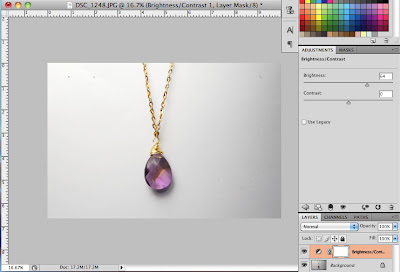
Step 1: Create a new layer fill for Brightness/Contrast.


Step 2: Boost the brightness up until your photo is more vivid. Don't worry about getting it completely white yet.


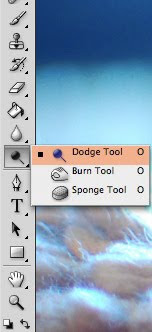
Step 3: Choose a dodge brush and select midtones.


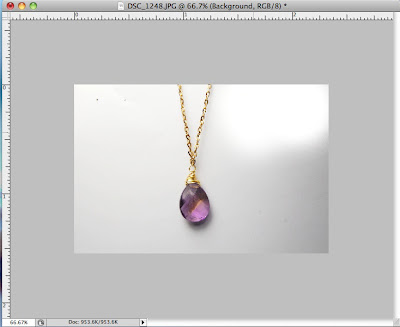
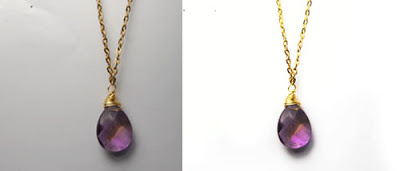
Step 4: Start brushing the background of your photo. The gray background soon becomes a lighter white.


Step 5: Now select your burn brush to darken your product. For this necklace, dodge creates a deeper color.


Here is your finished product!


I hope you all enjoyed this tutorial! And I hope your product photos become beautiful and amazing!

Deer in a Bottle Blog

Deer in a Bottle Designs
Related Posts Plugin for WordPress, Blogger...